
Does Canva Reduce Video Quality? Test Results + Better Workflow (2026)
Many creators ask the same question before publishing: does Canva reduce video quality after background removal and export? We tested common Canva workflows on talking-head clips, product demos, and motion-heavy footage to identify where quality can drop and how to prevent it.
Short answer: Canva can produce usable output for quick social content, but quality loss becomes more visible in edge detail, motion consistency, and repeated exports. If quality is a priority, your workflow decisions matter more than any single setting.
If you are actively comparing tools, start with our [Canva alternative page](/alternatives/canva/) for feature-level differences, then review [pricing](/pricing/) and real-world [examples](/examples/) to validate expected output quality.
Test setup and what we measured
We tested three scenarios:
- Talking head with soft hair edges
- Product demo with hand movement
- High-motion clip with camera movement
For each clip, we compared:
- Edge quality around hair and hands
- Motion stability frame-to-frame
- Compression artifacts after export
- Practical editing flexibility in downstream tools
Where Canva quality loss usually appears
In our tests, quality loss most often showed up in these places:
- Fine edge detail in hair and fingers
- Temporal shimmer during fast movement
- More visible artifacts after re-export cycles
- Limited transparent export flexibility for advanced compositing
This does not mean Canva is unusable. It means Canva is best for lightweight workflows, while production pipelines usually need stricter export control.
Canva vs RemoveBGVideo (crawlable comparison table)
| Criterion | Canva | RemoveBGVideo |
|---|
| Motion edge stability | Good for simple scenes, weaker in fast motion | Optimized for video motion and cleaner temporal consistency |
| Transparent export flexibility | More limited for advanced alpha workflows | WebM alpha, MOV alpha, PNG sequence support |
| Pricing model | Plan-based ecosystem with broad design tools | Pay-as-you-go focused on video background removal |
| Workflow complexity | Easy for quick social edits | Simple upload-preview-export flow for dedicated video cleanup |
| Best use case | Fast all-in-one design tasks | Quality-focused background removal and transparent output |
Better workflow when quality matters

If your team cares about motion quality and clean edges, use this workflow:
- Record high-quality source (1080p+ with stable lighting)
- Avoid multiple export cycles
- Preview edge-heavy timestamps before final export
- Match output format to destination (web, ads, editing timeline)
- Keep one master export and derive channel variants from it
This reduces cumulative compression loss and keeps output more consistent.
Practical export recommendations
- For short social posts: prioritize speed and one clean export pass
- For product pages and ads: prioritize edge quality and bitrate
- For editor handoff: prefer transparent-capable output formats
The key is to avoid repeatedly re-encoding the same asset across tools.
FAQ

Does Canva always reduce video quality?
Not always. Quality impact depends on source footage, motion complexity, and export settings. Loss is usually more visible in fast motion and fine edge areas.
Why do edges look worse after export?
Edge quality can degrade from compression plus imperfect frame-by-frame segmentation. Hair, fingers, and motion blur are the first places this appears.
Which export settings reduce quality loss?
Use the highest practical resolution, avoid repeated export/import cycles, and keep one master output for downstream edits.
Is Canva enough for transparent video workflows?
For lightweight tasks, often yes. For advanced transparent workflows (web overlays, post-production compositing), dedicated tools with broader alpha export support are usually more reliable.
Should I switch tools for production workloads?
If you process video weekly, need consistent edge quality, or require transparent exports, a dedicated background-removal workflow is usually faster and more predictable.
Final takeaway
Canva is a convenient tool, but convenience and quality are not always the same thing. If your content depends on motion detail, clean edges, and repeatable exports, use a workflow designed for video-first processing.
Start with a quick quality benchmark using your own footage, then choose the workflow that gives stable output at scale.
Want to test a cleaner workflow now? [Try Free Preview](/dashboard), then compare output against your Canva export before final publishing.


Ready to Try It Yourself?
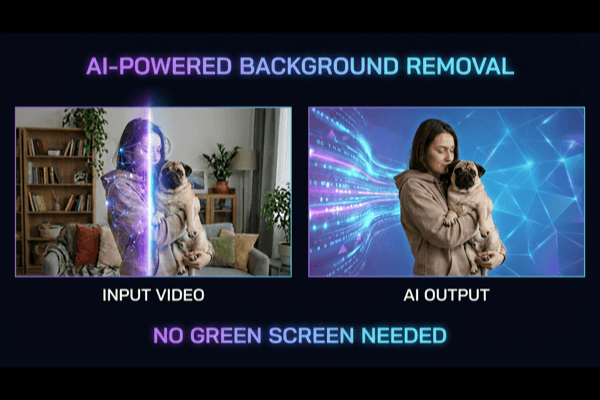
Put what you learned into practice. Remove video backgrounds with our AI-powered tool.
Try Free Now